


FSK assembly procedure
Introduction
The SubConn® OM series of connectors is supplied as a quick reliable and watertight solution for customers who require installation of standard SubConn® connectors on a non-standard cable or for quick, efficient field retermination.
The OM connector series mates with the compatible standard SubConn® series.
The connectors are produced with a tube brass body and 7 cm pigtail wires which are spliced and moulded to the cable using a pre-formed “Boot” and pre-packed ambient temperature curing polyurethane.
The end result is a professional, rugged and watertight termination rated to full ocean depth. The connector is available in 2 to 16 pin male and female configurations together with all the specials with the same shell size.
Operational steps
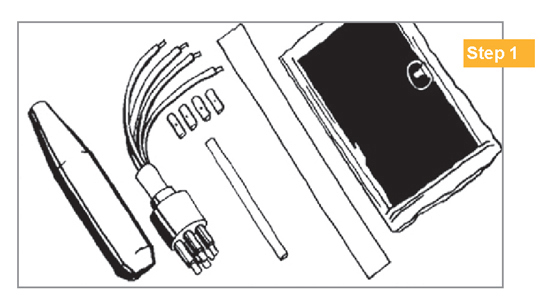
1. Ensure that the correct materials are available for the planned job
- The correct OM connector, e.g. OM6F (not included in the FSK)
- The correct “Boot” (e.g. OMBB)
- Adequate moulding material (e.g. 2131, 90 g from 3M)
- Primers (Scotchcast™ Resin Primer 5136 from 3M)*
- Acetone for degreasing*
- Crimp sleeve and heating gun
- Soldering iron, solder, side cutters, cable stripper and small paint brush
* Please notice that primers and acetone are not part of the delivery. You will need to purchase these items individually to be sent as dangerous goods or purchase them locally.
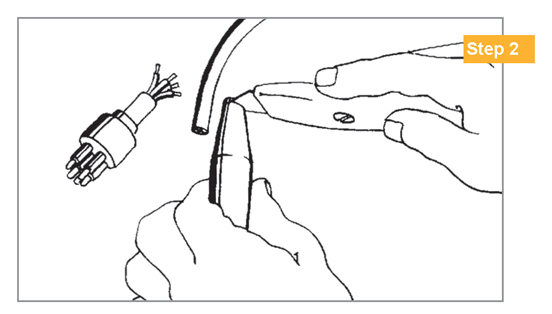
2. Cut pigtail wires on OM connector to approx. 2 cm from the brass body. Trim back tapered cable entry on boot until the cable is a snug fit (approx. 0.5 mm less than cable diameter).
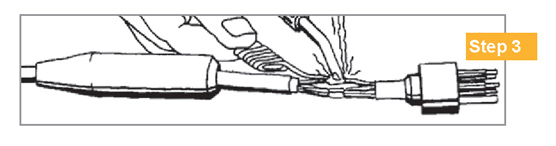
3. Prepare cable to be connected by stripping 3 cm off the jacket. Solder or crimp cable wires to pigtail on OM connector and insulate using crimp sleeve, heat shrink, or electrical tape. The spliced conductors should be twisted together in the same direction as laid in the cable.
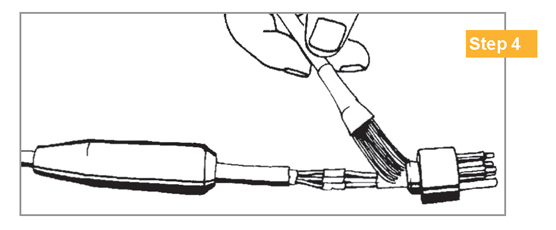
4. Degrease all moulding surfaces including cable jacket, conductors and brass body with acetone and allow to dry. Apply appropriate primer to brass body conductors, cable jacket and neoprene base of connector with a small brush and allow to dry (approx. 30 min. at 200°C). Do not touch primed surfaces after primer application.
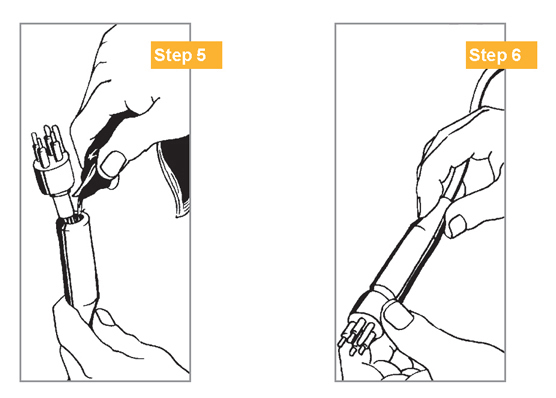
5. Select the appropriate polyurethane twin pack (e.g. 2131, 90 g for a single moulding) and mix the PUR material according to supplier instruction. Cut off the corner of the pack and squeeze the material into the boot as shown.
6. When the boot is full of material slide it up the cable until it fits tightly over the neoprene protrusion on the back of the connector. Push the cable into the boot about 2 mm and wipe off any excess visible polyurethane material. The connector will be ready for use after 12 hours at 200°C.
Safe handling procedures
To comply with recommended health and safety procedures; ensure the use of barrier creams, gloves and a clean, well-ventilated work area.
Step files
Locking sleeves
DLSA M.stp
DLSB F.stp
DLSB M.stp
DLSC F.stp
DLSC M.stp
DLSM1F.stp
DLSM1M.stp
LS2000.stp
LS2400.stp
MCDDWLS.stp
MCDLS F.stp
MCDLS M.stp
SSLSA F.stp
SSLSA M.stp
SSLSB F.stp
SSLSB M.stp
SSLSC F.stp
SSLSC M.stp
MCSSLS F.stp
MCSSLS M.stp
DLSMC1-F.stp
DLSMC1-M.stp
Nut and washers
SUBCONN BN 3_4.stp
SUBCONN BN 3_8.stp
SUBCONN BN 5_8.stp
SUBCONN BN 7-8.stp
SUBCONN BN7_16.stp
SUBCONN BW 1_2.stp
SUBCONN BW 3_4.stp
SUBCONN BW 3_8.stp
SUBCONN BW 5_8.stp
SUBCONN BW 7_16.stp
SUBCONN BW 7_8.stp
SUBCONN SSN 1_2.stp
SUBCONN SSN 3_4.stp
SUBCONN SSN 5_8.stp
SUBCONN SSN 7_8.stp
SUBCONN SSN3_8.stp
SUBCONN SSN7_16.stp
SUBCONN SSW 1_2.stp
SUBCONN SSW 3_4.stp
SUBCONN SSW 3_8.stp
SUBCONN SSW 7_16.stp
SUBCONN SSW 7_8.stp
SUBCONN SSWA 7_16.stp
SUBCONN SSWB 5_8.stp
Overmould boot (OMB)
Snap rings
Straps
Blank plugs
X_B files
Locking sleeves
DLSA M.x_b
DLSB F.x_b
DLSB M.x_b
DLSC F.x_b
DLSC M.x_b
MCDLS F.x_b
MCDLS M.x_b
SSLSA F.x_b
SSLSA M.x_b
SSLSB F.x_b
SSLSB M.x_b
SSLSC F.x_b
SSLSC M.x_b
MCSSLS F.x_b
MCSSLS M.x_b
DLSMC1-F.x_b
DLSMC1-M.x_b